Abstract
You need to use the correct input framerate. For anime that’s usually 7.992 fps or 11.988 fps.
Abbreviations and vocabulary:
| Comp | Composition |
| Fps | Frames per second (a unit for frame rate) |
| AE | Adobe After Effects |
| Integer | A whole number. 1.634 is not an integer. 5 is an integer. 1/12 is not an integer. Everything else I call a fraction for lack of a better word. I would’ve liked to sound more professional than that???? |
Useful keyboard shortcuts:
| ctrl + alt + t | Enable time-remapping |
| Double tap w-key with selected layer | Reveals time-remapping property of the layer |
| ctrl + shift + c | Create pre-composition from selected layer |
| page-up / page-down | Go one frame back/foward |
| Ctrl + left-arrow / ctrl + right-arrow | Go one frame back/foward |
| Hold ctrl while dragging value with mouse | Change value more accurately (very useful for time-remapping keyframes!) |
| Hold ctrl while dragging the time cursor across the timeline | Scrub timeline with audio (life hack #1) |
Since 2013, I regularly get questions about how motion interpolation using Twixtor works, and I have repeated myself so frequently that one day 2 years ago I justpublished one of my answers. It sucked though. And I still get questions frequently, for which I then have to link them my explanation while feeling bad about it, as badly written and outdated it is. Other Twixtor tutorials are popping up on YouTube, but sadly most of them mostly gloss over some of the most important details when setting Twixtor up, and even get them wrong most of the time.
It has also come to my attention that people are actually making money off of selling their “Twixtor settings” to unknowledgeable editors in lieu of the rising popularity of so called “Twixtor edits” on vine.
So finally, welcome to this guide, which will explain the necessary theory, tricks, nuances and especially the fundamental workflow needed to implement Twixtor interpolation to anime footage in After Effects. In this guide, I will try very hard to not suck at explaining shit, and hopefully be able to bring across how interpolation is properly inmplemented and make you understand how it works on a fundamental level in order to make you able to experiment on the workflow yourself as you see fit.
Spoiler: There are no general-purpose Twixtor settings. So don’t buy these settings from sellfy.com.
Disclaimer: This guide seems very long and the wall of text just to figure out a single scene might seem very intimidating! Hell, even the introduction as already gotten so awfully long. But I promise this is only because I am taking very extreme measures to make you understand how it actually works. Once you get used to the procedure, it should not take more than 15 seconds per scene to set up the interpolation correctly (given you don’t use anime that change the animation framerate mid-scene frequently).
Another disclaimer: I do not claim this is the perfect way to do Twixtor. I myself stray from the described path in some unusual cases. But I do think that this way of implementing will work well to make you understand how Twixtor actually works within After Effects. Feel free to experiment on the described methods as you see fit.
ok so let’s start I guess
0 What’s motion interpolation lol
Motion interpolation is basically black magic that makes you famous on YouTube and Vine. If you want to start your career in vine horse edits, motion interpolation is the way to go.
In video editing, we usually work with footage at a set framerate, for example a clip playing at 24 frames per second (fps). Now there might be an occasion where you as an editor want to slow the footage down to a third of the speed, for example. This however introduces a problem: As we only have 24 frames that now need to be played back in 3 seconds instead of 1 second, the resulting video will only play at a framerate of 8 frames per second. This essentially will reduce the smoothness of the animation by a factor of 3.
Now picture this: What if we could simply create more frames, which are automatically calculated by looking at two adjacent frames, and “guessing” where things should be in an intermediate step. This estimation of where things are in between two frames, we call motion interpolation. Interpolation basically means: “calculating what should be in between”. So motion interpolation simply refers to using the actual motion of objects in the scene to calculate more frames that could be used in between two original frames to create a smoother playback. Look at this example to see it in action for anime footage:

↑ without Twixtor
↓ with Twixtor

Now, motion interpolation can be used for other things as well. Most prominently, motion interpolation also allows us to export video at an arbitrary framerate. We could basically convert a 24 fps clip to 60 fps , or even to 15046 fps. That’s mad. (turns out we can’t, as AE only supports up to 99 fps. I cry.)
More examples of how motion interpolation can be used are described in section 6.
So now that you know what this technique is which you particularly already knew so well that you actually went to a guide in order to implement it yourself, let’s get into some technical aspects of anime footage essential to the actual implementation.
1 What kind of scenes will work well with Twixtor?
I will hereby burst your bubble and tell you that actually, Twixtor is pretty much impossible to use on a majority of all anime scenes. Anime are animated at low framerates (as we will get into soon), and sometimes just badly animated or too fast, so it quickly becomes super difficult for any algorithm to track the actual motion of objects within a scene. If you are planning on making a whole video just with interpolated scenes, you have to prepare to be heavily limited in your scene selection.
So If you use Twixtor frequently, it is very important to have a feel for what kind of scenes would be impossible or simply too much work to make them look ok. Therefore, let’s try to understand what gives Twixtor a hard time in general terms. The following examples should give some general rules regarding what to look out for to approximate the quality of the Twixtor interpolation in your mind. I will also give some directions as to trying to process unavoidable cases.
1.1 Objects are moving too fast
Essentially, the more certain objects move from one frame to the other, the worse Twixtor will be. If an object moves across half of the screen in a single frame, Twixtor will not be able to track it.
However: Moving objects can be easily tracked with the Twixtor Pro functionality of guidance masks, which are described in section 4.3.4. They can sometimes make horrible scenes look ok fairly quickly.
1.2 Objects change in shape or color
If objects are not easily recognizable between two frames, things can get bad really quickly. This is often the case when characters are turning, eyes are closing or things are mutating.
Often, this can be improved on with the help of Twixtor Pro motion layers and Twixtor Pro guidance masks, as described in sections 4.3.3 and 4.3.4. Sadly, in many bad cases all work will be futile and the scene has to be scrapped as a Twixtor candidate.
1.3 Objects move in front of other objects/move out of frame
If some moving parts visually cover other moving objects, Twixtor, left by itself, has a really hard time. You will often encounter this scenario processing clips involving walking, running, interacting characters and long moving hair that blows in the wind oh so beautifully.
We can help Twixtor in these cases using Twixtor Pro motion layers as described in section 4.3.3. If there are too many complicated intersections of objects you can run out of motion-layers fairly quickly and you might have to make simplifications or give up on the scene.
Screenshot of ghost audition umarmung zu viele sachen intersecten <- if you see this message instead of an actual screenshot this means that I still haven’t decided on whether I want to put a screenshot here or not lol
1.4 Patterns
If some moving object has a pattern distributed across a larger area, Twixtor will get confused about the movement of the object. I myself have not experimented with these scenes very much, but I guess that motion guidance masks in Twixtor Pro could help a lot here. See section 4.3.4.
Moving hair often suffers from this as well. Motion mattes will also help.
1.5 General considerations
Generally speaking, Twixtor will work better the more frames it has to work with given a single animation. The more slowly things are animated across frames, the better Twixtor will be able to guess the actual motion of the scene. Explicitly, this means that scenes which already are moving in slow motion are perfect to be interpolated to even slower speeds.
Analogously, if a scene is badly animated and uses very few frames for a big animation, you might want to consider giving up right in the beginning.
2 Animation framerate vs. footage framerate
Anime are a mess, I tell you.
You probably edited AMVs before, so I take it you’re kind of familiar with actual anime footage. Now I invite you to take a closer look at it.
First thing to note is that pretty much all anime are natively rendered and encoded at 23.976 fps. I have yet to encounter a single anime that is natively rendered at a different framerate (disregarding weird encodes on the internet).
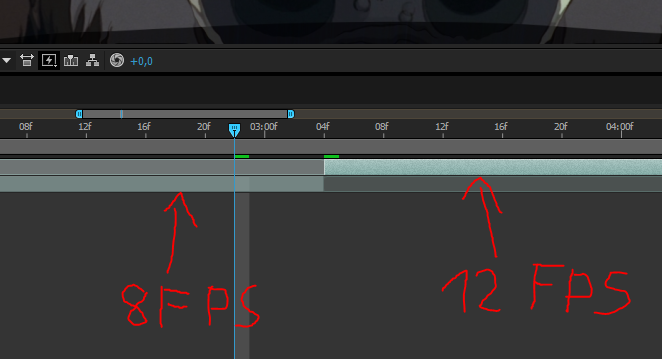
However, this is actually not the only framerate we should care about. Since we want to interpolate the animation of the scene, we need to know the framerate of the objects which we actually want to have in focus. You know, anime animators are actually lazy as hell and don’t draw a new frame every rendered frame (un-be-lievable). Most anime animations actually only move at 12 fps or 8 fps! You can easily check this by going through the footage frame by frame.
Take note that, when I talk about 8 fps or 12 fps, I usually mean 23.976/3 fps or 23.976/2 fps. This is of course because we can only distinguish between whole frames, and the closest we can get to 8 fps within a 23.976-fps-encoded video is 23.976/3 = 7.992 fps.
I will from now on call the “true” framerate at which the object in question is actually animated at the “animation framerate”, which is usually 7.992 (=23.976/3) or 11.988 (=23.976/2) fps, as opposed to the “footage framerate”, which is 23.976 fps.
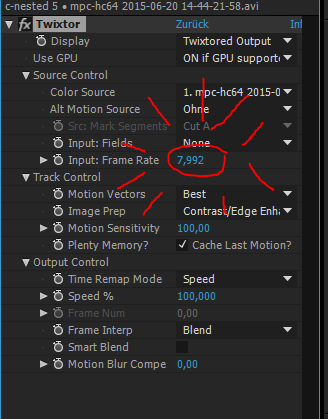
Arguably, getting the animation framerate right is the most important aspect when we get into actually setting up Twixtor. You will need to set the animation framerate as the “Input: Frame Rate” within Twixtor. To illustrate what it looks like when you get the value wrong, see these examples:
↑ Input framerate: 7.992 fps (correct)
↓ Input framerate: 11.988 fps (wrong)

Take note that the animation framerate is not necessarily constant within a scene. This is a very important potential complication which we will learn to process as well.
3 Even more essentials of interpolation:Fractions of frames
So next, let’s talk about how After Effects works. Btw this is based on pure empirical observations on my part, so can’t say for sure how AE is actually coded. But this is how it can be understood to make the infrastructure with Twixtor more transparent.
You probably know that After Effects uses comopositions to enable recursive project infrastructure. So, a comp A has some layers which you can stack, but layers can themselves be a comp B. To render a frame within comp A, AE needs to look into compB to know what this comp renders to use it within comp A. I’ll describe this process as AE requesting a frame from comp B.
Now, the hot stuff is that After Effects is capable of requesting fractions of frames from a composition, and Twixtor is able to output fractions of frames. I could also call them “fractions of frame-numbers”. It is a time-coordinate that specifies what time of the clip or comp someone is talking about. Since we can specify not only integers as frame numbers, but also fractions, we can specify time-coordinates in between two consecutive frames!
In other words, the support for fractions of frames means that the time resolution (=”how many different frames could we specify per second”) is higher than the framerate of a comp! A framenumber 2.5 would represent an in-between frame exactly half between frame 2 and frame 3. It has progressed in time from frame 2 but has not yet reached frame 3. Obviously, requesting frame 2.5 from a footage element makes little sense, as that in-between frame does not exist. However, once we do this for Twixtor-enabled comps, Twixtor will render the in-between frame exactly as requested.
Now, this might all seem counter-intuitive for AE-users, as at all times the time-cursor can only be placed to full integer frame numbers (so not fractions of frames). This is due to the nature of the outputted video when the video is actually rendered. The final video will only have integer frame numbers stored (otherwise the filesize would have to be infinite), so those are the only ones you can view within AE in a comp.
For example:
Assume we have a comp called “c-nested” placed within a comp called “c-main”. If we now slow down c-nested to half its speed, After Effects will not simply duplicate every frame. After Effects will actually start requesting “half” frames every other frame. That essentially means the order of frame requests (listed by frame in the main comp) will look like this:
| Frame count in c-main | 1 | 2 | 3 | 4 | 5 | 6 | 7 | 8 | 9 |
| Frame requested within c-nested (@ 50% speed) | 0.5 | 1.0 | 1.5 | 2.0 | 2.5 | 3.0 | 3.5 | 4.0 | 4.5 |
If we slowed down c-nested to a third of its speed, it would look like this:
| Frame count inc-main | 1 | 2 | 3 | 4 | 5 | 6 | 7 | 8 | 9 |
| Frame requested within c-nested (@ 33% speed) | 0.333 | 0.667 | 1.000 | 1.333 | 1.667 | 2.000 | 2.333 | 2.667 | 3.000 |
This also applies for time-remapping. Animating the time-remap property of a layer also allows for fractions of frames being requested from that layer.
Another case where After Effects would request fractions of frames are conflicting framerates. Imagine a comp “c-main” where the framerate is set to 60 fps. Now this comp contains the comp “c-nested” which is actually only 30 fps. In this case, After Effects will not simply duplicate the frames on the top level, but rather also just still request the appropriate frames in the sequence. This means that we also get a behaviour like this:
| Frame count in c-main (60fps) | 1 | 2 | 3 | 4 | 5 | 6 | … | 59 | 60 |
| Frame requested within c-nested (30 fps) | 0.5 | 1.0 | 1.5 | 2.0 | 2.5 | 3.0 | … | 29.5 | 30 |
Note that there is a difference of requesting and actually outputting a frame. If the footage is not enabled for interpolation, the frame requested might be for example 0.667, but when it comes to actually rendering the frame, and no interpolation is enabled for the footage element, AE will just simply round the number to an integer and then output this frame. This will result in the simple repetition of frames that you classically expect from slowing down a non-interpolated footage element. However, if the layer is Twixtor-enabled, as we will see in this guide, there will be a way to actually output the exact fraction of this frame using motion interpolation.
Also note that if you animate some properties in After Effects via keyframes, this animation is actually not based on the framerate at all, and fraction of frames will also be properly rendered in this case.
4 Finally: How to do Twixtor on Anime in AE
Now that we’ve understood all the necessary technical stuff, we can now start doing some actual Twixtor for once.
However the first section will only give an overview for the project infrastructure in order to further delay your progress.
4.1 The Twixtor infrastructure in After Effects
In order to use Twixtor in big AE-projects, it is essential to have a proper infrastructure in place that is able to fully implement Twixtor and won’t mess up parts if for example some small Twixtor setting on a clip is changed. The following is not the only way to do this, but it is in my experience the most robust I’ve tried out yet. (well to be honest I don’t think I’ve tried out anything fundamentally different. This is just intuively the best thing I could imagine)
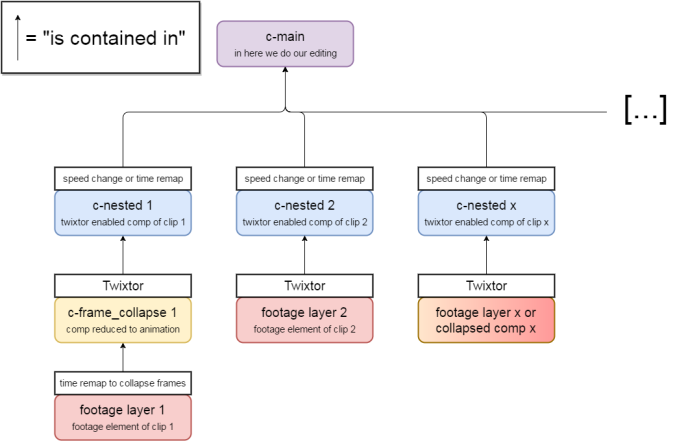
Here you can see the basic concept of the AE infrastructure. The blue elements are all in the same comp and represent the clips which make up your edited video.
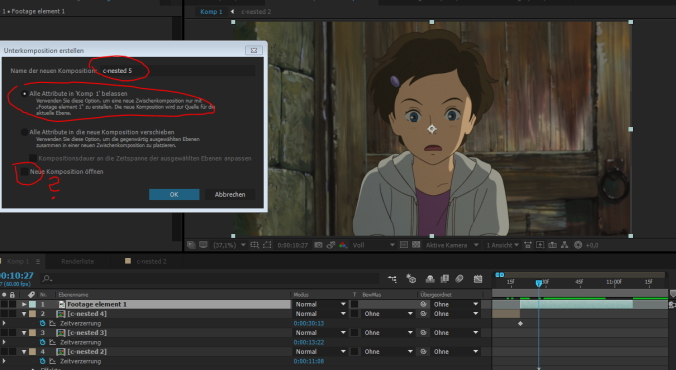
Next to this beautiful flowchart above I also prepared a cool screenshot for ya, where you’ll see how this then should look like within c-main (=Komp 1 in the screenshot, Zeitverzerrung = time remap)

So what’s all this?
Let the main editing happen in a composition called c-main. In this comp, all the editing, cutting and time-remapping will be done. This is basically the same as what most editors using AE for editing are probably familiar with. So also, most effects can be implemented in here.
The framerate of this comp will determine the framerate in which you are editing in. You are free to change the framerate of this comp in the middle of the project. Twixtor will perfectly handle this change automatically due to the ability of AE to request fractions of frames, as described in the section before this one.
All Twixtor-enabled clips in this comp will also be compositions. I will call them c-nestedfrom here on out.
Comps of the type c-nested will be self-contained regarding Twixtor, ensuring that no Twixtor shenanigans will be needed in c-main. They usually have the same framerate as the raw footage, 23.976 fps (that’s not essential though, but helps with a lot of the stuff done with Twixtor Pro). These comps are capable of outputting fractions of frames. For example, requesting frame 1.5 of a comp of type c-nested will correctly output an interpolated frame exactly in between frame 1 and 2. That makes using all AE-native speed tools usable in conjunction with interpolation! We can slow down these comps to arbitrarily slow speeds and they will interpolate accordingly. Time-remapping also works in its dynamic fashion. Speed-ramps generated this way will be the smoothest possible. And if all that wasn’t enough, conflicting framerates are also a thing of the past! We truly start to head out into black magic territory here.
The c-nested Twixtor-enabled comps can contain further comps. I will call them c-frame_collapse, because they will be sometimes used to compress the frames of an animation to a constant framerate in order to prevent changing framerate being an issue.
4.2 The Twixtor procedure
As before, the Twixtor-enabled comps will be called c-nested. We will now learn how to prepare them.
Step1: Creating the c-nested comps
The main comp in which the editing with various clips takes place shall be called c-main, just like above.
Now select the clip in the timeline of c-main which we want to turn into an interpolated clip. Pre-compose this layer (ctrl + shift + c). Enter a name for this comp. You can call it whatever you want, but I recommend that you choose names which will make you recognize that this is a c-nested type comp. Select that you want to “leave all attributes in c-main”.
Next, open this new comp. This comp should now automatically have the same framerate as the footage, 23.976 fps. It should also be exactly as long as your raw footage.
Step2: Determining the animation framerate
Next, we need to determine the actual animation framerate (described in section 1). To do this, we first move the cursor to the beginning of the point in time where our clip first appears in the footage.
Then, focus on the object in the scene which the interpolation should focus on and make use of the keyboard shortcuts page-down or ctrl + right-arrow to advance by single frames. Count the number of raw frames which are duplicates in regard to the focused object. This should usually be only 1 – 4 raw frames for each new animation frame. In other words, going through all raw frames of the clip, (only) every 1st, 2nd, 3rdor 4th frame, the object should appear redrawn. Normally, this number is constant, but if you are unlucky it can also change in the middle of the clip. The animation framerate of the clip will then be 23.976 fps divided by the number of duplicate raw frames per redrawn animation frame. This means, if the number of duplicates was 2, the animation framerate is just under 12 fps. If it was 3, the framerate is ~8 fps.
So this is how you actually count frames to determine the animation framerate. Advance single frames with the “page-down” key or ctrl + right-arrow. As you can see, the newly drawn frames appear every 3 frames here, so the animation framerate of this clip equals to 23.976 divided by 3 = 7.992 fps.
Sometimes, other parts of the clip like moving backgrounds or other characters move at different framerates. Make sure not to get confused by those. You should only focus on whether your character of focus gets redrawn.
Hopefully, the animation framerate is constant for your clip. But you need to check the whole clip to be sure. If the framerate changes, which can happen (in Monogatari Series it happens fairly often), we will need to adjust for that.
Step3a: In the case of constant animation framerate
If the animation framerate is constant, you are lucky. You can now apply Twixtor to the footage. If you plan on using advanced measures to take care of Twixtor artifacts, apply Twixtor Pro instead.
Now the single most important setting to change within the Twixtor properties is “Input: Frame Rate”. Set it to the animation framerate which you determined in the previous step. You can type “23.976/2” or “23.976/3” and the resulting framerates will be perfectly accurate (AE can compute the “divided by” symbol “/”).
Essentially, you should now be done with this scene. All other properties work exactly like they are described in the official Twixtor manual.
Side remark: In the case that you want multiple objects in focus that move at different animation framerates (this happens only very rarely luckily), you need to take advanced measures:
Duplicate the layer including Twixtor and set the different “Input: Frame Rate”-values for both Twixtor instances. Then precompose both layers individually, moving all attributes to the new comps. Finally, apply masks on both comps to separate the characters which move at different animation framerates.
This can be a pain, but works. The reason for why we needed to separate the footage into 2 new comps again is because Twixtor does not respect masks on it’s source layers, as they are only used for advanced stuff within Twixtor Pro (see further sections).
Now go to Step4.
Step3b: In the case of changing animation framerate
If the animation framerate only changes clearly, such that you can actually make out the parts where the animation framerate changes for a larger chunk of frames, you can try the following:
Split the layer at the frame where the framerate changes, and then treat both parts as if they had a constant framerate and proceed exactly as described for Step3a.
Disclaimer: This way of handling a changing framerate can leave a small “jump” in the animation at the point where the layer was split. I am not entirely sure why this happens or how to treat this issue. Often, this can be disregarded though, as it is not a very noticeable effect. Sometimes, it does mess things up though. In this case, go to Step3c, where I describe the “brute-force” way.
If the framerate changes very often, or the framerate is entirely undefined (number of duplicate frames changes all the time), you should go to Step3c.
Step3c: The “brute-force” way
If everything else fails, we’ll force the footage to have a constant framerate.
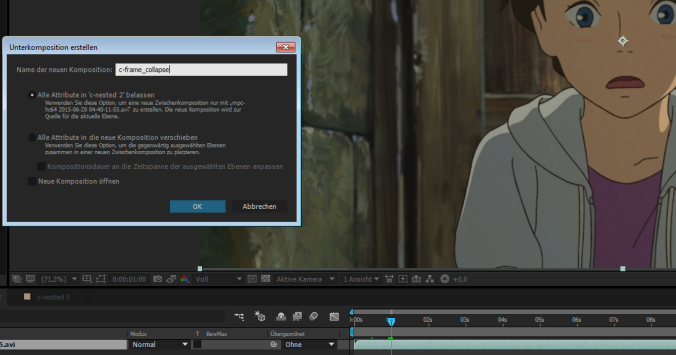
We do this by selecting the footage one more time and then pre-compose again (ctrl + shift + c). I will call this new comp c-frame_collapse but you can again name it whatever you want.
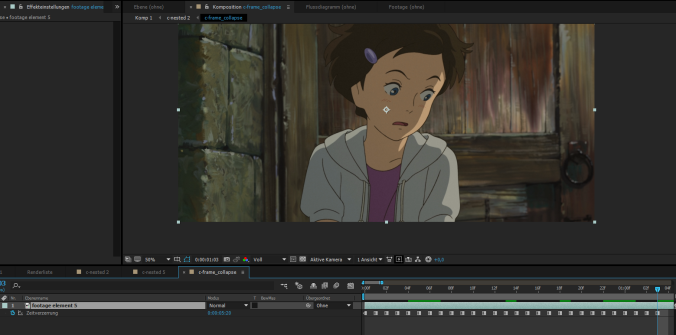
Open this new comp, select the footage again, and enable time-remapping (ctrl + alt + t). Delete the last keyframe and go to the beginning of the comp. Now set the value of the first keyframe (use ctrl to drag the value more accurately) to exactly the first frame of the clip you want to use. Select the keyframe and press ctrl + alt + h. This will disable the keyframe-interpolation. (I do this just because I sometimes forget to delete the last keyframe, which then would mess me up, as advancing a frame also advances the time-remap value).
Now, we use time-remapping in such a way to ensure that every frame of c-frame_collapse we will see an actual newly drawn frame of the animation. In other words, we skip all the duplicate raw frames.
To do that, we use a trick that luckily works because the keyboard-shortcuts work out like that:
Press and hold down ctrl. Use right-arrow to advance to the next frame. Then click and drag the value of the time-remapping-property (while still holding down ctrl) toadvance time-remapping to the next frame of the animation, or in other words, to thenext newly drawn frame. Still hold down ctrl. Then go to the next frame with right-arrow and change the time-remapping to the next animation frame again. Repeat this process until the whole clip is done.
Keyframes will then look this way, kinda
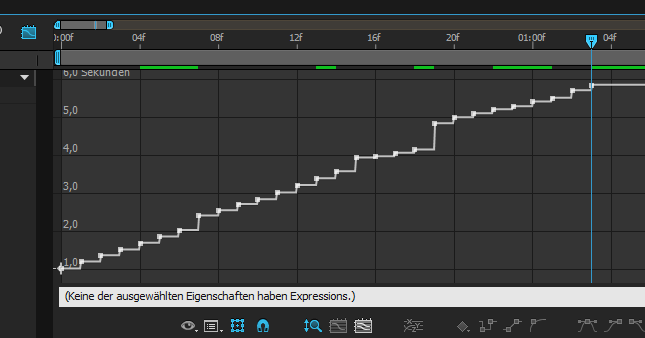
In the keyframe diagram you can then actually see why I had to collapse the frames here. The frametimes are not regular, but I had to skip a varying amount of frames to get every drawn frame to align with a new frame of the comp.
We will now have the footage newly drawn every frame. This means that the animation framerate is now constant.
So now, we can go back to our c-nested comp, apply Twixtor or Twixtor Pro, and set the ‘Input: Framerate’ to 23.976 (the framerate of c-nested). We should now be done.
Please note that the brute-force method has a downside:
Whilst the measures in step 3a and 3b preserved the original speed of the clip, in the brute-force method we essentially mess up the intended speed for the clip, and it even changes as the animation framerate changes, as we collapse all unique frames (regardless of how long they were displayed in the original footage) to a constant framerate. If, and only if this proves to be a problem, this can be fixed with some effort:
Go into c-main, and time-remap the c-nested comp so that the speed seems natural again. Then pre-comp the layer (and move all attributes to the new comp) to enable simple time-remapping again on top of this.
At some points in the past I did some more advanced stuff to exactly preserve the original speed of the clip despite collapsing the frames, but it was so complicated that I don’t remember right now. It would be too long of a chapter anyway.
Step4: Check the result
Now the interpolation should work. As a last measure you should check whether any objects move off-screen during the scene and enable the Twixtor property “smart blend” in that case.
You can now go back to c-main and check out how it looks in your edit. You can also now try out some new time-remaps including some cool slow-motion or something and probably notice that the Twixtor artifacts look horrible. In that case, go to the next section.
Make sure that the interpolation is consistent. There should be no point in the animation where the motion stands still between two frames. If that still happens sometimes, the best guess is that you did not enter the correct “Input: Frame Rate” or did not notice that the animation framerate in the footage actually changed mid-scene.
Getting the input framerate wrong looks like this:
↑ Input framerate: 11.988 fps (wrong)
↓ Input framerate: 7.992 fps (correct)
Using ceddic’s Twixtor script
There is an AE-script made by ceddic, which will automatically do Step1 and Step3a for you. It will ask you for the animation framerate, which you will have to have determined beforehand (see Step2). It won’t work with changing framerates. I personally do not work with this script for that reason, but use presets instead. I describe this in the next section.
Using presets to speed things up
Since most scenes do have constant framerates, it is helpful to set up some Twixtor presets with specified “Input: Framerate”. I also increased the ‘motion sensitivity’ property to 100 for these presets, but that is only my personal preference. It is useful to have presets for the following framerates: “6 fps” 23.976/4, “8 fps” 23.976/3, “12fps” 23.976/2 and “24 fps” 23.976. Make sure to incorporate your preferred option of GPU usage of Twixtor within these presets (available since Twixtor 6).
4.3 Removing Twixtor artifacts (= unwanted Twixtor Warping)
Twixtor is not remotely perfect in guessing what happens between two given frames. If it guesses wrong, it will move certain parts of a picture in a way that a human viewer can immediately recognize to be wrong. This is then what we call a Twixtor artifact. It has a warped look because the Twixtor interpolation heavily uses warping to apply its estimated motion to the footage.

What makes this animation look so horribly ugly are called Twixtor artifacts.
You can try to play with the “motion sensitivity” property in Twixtor, but most of the time, this won’t change much. (I mostly have it at 100). You can also try to enable “image prep: contrast enhance”, but it also can’t work wonders. So if we want to really fix some of the bad and persistent artifacts, we need to go to Twixtor Pro. But now that I think about it the things described in 4.3.2 are also available in regular Twixtor, I think. So maybe you could try that out first if you’re reluctant on going to Twixtor Pro.
All the following operations will happen in the c-nested comp of a given clip.
Since all the procedures for Twixtor Pro are already explained very well in the official manual, I will not describe those in detail but rather just point out what to watch out for when doing it for the difficult footage type of fucking anime.
4.3.1 Alternate Motion Source
Twixtor Pro gives you the option to use another layer as “alternate motion source”. This essentially means that Twixtor looks at this other layer to try to track all the motion of the clip, but still apply the interpolation to the original layer.
There are two main uses for this.
Firstly, you can use it if the scene has low contrast, looks flat or just generally makes moving objects hard to distinguish from each other.
Duplicate your original layer, delete Twixtor from it, and apply color correction in order to make the objects easier to track. Then, don’t forget, precompose the layer (ctrl + shift + c) and move all attributes to the new comp. Finally, use the alt motion source setting in the Twixtor effect on the original layer and set it to this new layer (which should be the new comp).
The second use for an alternative motion source are some cases where contrast has to be removed in order for the motion tracking to even make sense in the first place.
For example, there could be a scene where a shadow moves across some moving objects. The shadow interferes with your moving objects, but you rather want to focus on the movement of the objects. You can then use an alternate motion source that completely washes out the shadow but preserves the details of the objects. Twixtor will then not recognize the shadow for its motion estimation, but still apply the interpolation to the scene where the shadow is properly displayed. Of course this comes at the expense of inproper interpolation of the shadow.

Here you see the scene’s color source and it’s motion source. I altered the motion source such that the shadow in the face can’t be differentiated from the highlighted parts anymore.
And it makes a difference for the result:

You can see that the face looks notably less warped, however the animation on the shadow is completely gone.
This example is not perfect, as I also did some other processing on the version with alt motion source. The reason the sky gets warped here is beacuse I used motion guidance masks (described just in a bit) to make twixtor also track the hair better. As the sky is close to the hair, we get these additional artifacts (these can be easily fixed though, since the sky should only be static).
4.3.2 Different blending and warping methods
Every interpolated frame is basically a composite of two computed frames. Twixtor estimates the motion based on tracked pixels from one frame to the other. Now which direction in time does Twixtor track objects and on which of the two frames does it apply the warping based on the motion? The answer is both. And we can change the behaviour of compositing both methods to improve the look for our specific scene.
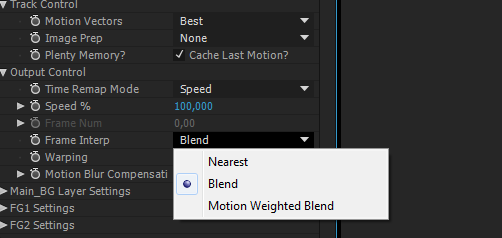
The standard blend mode is just “Blend”. This one simply does a crossfade between both methods. The further away the animation gets from the previous frame, the less will be the influence of the interpolation based on this frame, and the estimation based on the following frame gets more weight.
To improve how natural the blend looks for some type of animations, they implemented the method “Motion weighted blend”. Here, twixtor tries to introduce… well weight based on motion. To be honest, I’ve never really noticed much improvement upon using this method, as it basically still displays the artifacts with full exposure.
A very good copout to getting rid of artifacts is to use the blend mode “nearest”. This method will only ever use the interpolation from one direction at a time, and as the name suggests, decides this by looking at which of the two frames is closer to the current time. The upside is that only one method is displayed at a single time, so no blend related “duplicate objects” will ever be seen. The obvious downside is the cutoff point between the two interpolation methods. This is really noticable. One could say “well uninterpolated anime has these jumps too”, but then really what is the point of interpolation at all in this case? However, it really can be useful in some cases, as there still will be some impression of smoother animation left, as the frames will at no point be static as in the uninterpolated case.
Blend mode: Motion weighted blend

Blend mode: Nearest
Another thing to consider is changing the “Warping” to “forward”. This is mostly recommended if you use guidance masks (described later), but might also change things for the better in your specific shot.
4.3.3 Motion Layers
Perhaps the most powerful feature of Twixtor Pro is the possibility to implement motion layers. These are awfully effective in the case that multiple objects overlap each other while moving differently. Seperating them in up to 3 motion layers and one background layer can work wonders in scenes like these.
The way these work is that you have to prepare “motion mattes”, which will specify what parts of the scene belong to different kinds of motions. If you use masks to specify these, remember to precompose the layer and move the mask to the new comp (check “move all attributes…” in the new precompose dialogue) before setting it as a motion matte!
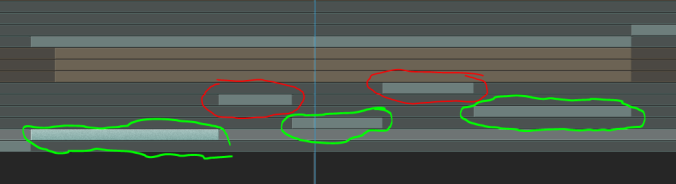
Another thing to watch out for is that these motion mattes should not care about overlaps between the different layers. This means, if something you want to specify as motion layer 2 gets covered by something from motion layer 1 in the clip, you should still prepare the matte as if layer 1 was not there. See the example animations and note how mattes extend beyond what is covered by a layer in front of it.
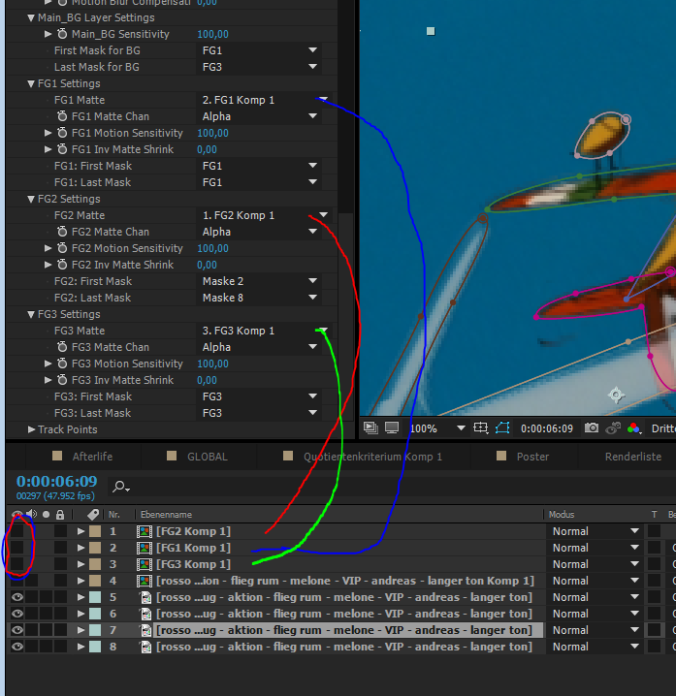
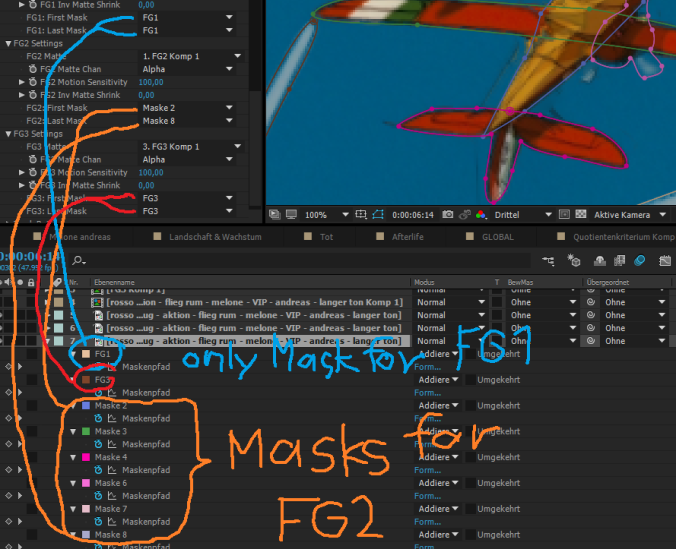
This is how you assign motion layers in Twixtor Pro. Note that the masks displayed here are only seen because they are applied on the main footage layer, to use them as guidance masks (seen later). These are just copies of the actual masks used to define the mattes. The original masks used to define the masks are applied on a solid and need to be entirely comtained within a new comp. In this case, the mask for FG2 is contained within “FG2 Komp 1”.
To troubleshoot motion layers, be sure to use the “display” property of Twixtor Pro, where you can isolate the render of individual motion layers!
Green: Foreground 1
Blue: Foreground 2
Red: Foreground 3
The rest: Background
Note that in these animations, the actual motion layers are only the filled out bits. The masks used to create the mattes are also used as motion guidance masks, which is the reason why they are still visible in the comp. However, the mattes should have the masks supressed within a precomp (as described above). So don’t get confused if your masks are not visible in these comps, that’s how it usually should be.
Also note that when rendering the results, you can of course turn off the motion matte layers.
Here’s another example for the use of motion layers. This example is notable because if you look at the two feet, they actually take turns as to which layer is in front of the other. This means that for this scene, I actually split the Twixtored layer into multiple segments to exchange the roles of Foreground 1 and Foreground 2 each time (Switching between the blue and the yellow matte). In the timeline it looks like this:
Green: foot 1 covers foot 2, red: Foot 2 covers foot 1
The masks on the clapping hands however are not used for the motion mattes, they are only for the guidance masks described in 4.3.4.
Now the next example shows the limits of only being able to define three motion layers:

Note that in this first screenshot, Foreground 2 (blue layer) is behind Foreground 1 (green layer) where the hand of the guy covers her. However, if you look at her hand, it actually covers some portion of the guy’s chest. This conflicts with the order of Foreground 1 (green) and Foreground 2 (blue).

This screenshot shows that eventually, his back hand (Foreground 3, red) reaches from behind her around her, and his fingers end up in front of her back. Here the fingers should also be in front of Foreground 2, even though they are part of Foreground 3. Another thing to note here is that you can clearly see how things covered by other objects are still part of the motion layer. This is an essential difference of how you usually mask out such parts for a traditional roto-job. The reason these overlaps need to be defined properly here is that Twixtor only then knows whether an object that is visible in one frame disappears behind another object in the next frame.
This is an example where I did not end up fixing these issues, as they were minor, but you can see how some scenes easily end up way more complicated than you might have thought initially.
Much is involved with motion layers, so be sure to carefully read the Twixtor Pro manual to properly implement them. They can sometimes be really work-intensive, and require really good precision of the motion mattes. You might consider using motion guidance masks instead in some cases.
4.3.4 Motion guidance masks
Motion guidance masks can have a really big impact on the interpolation quality, but they don’t have the same potential as motion layers to make some scenes look perfect.
But still, I myself underestimated the effectiveness of motion guidance masks and only came to use them in 2016 to their full potential. Their huge upside is that the masks do not have to be accurate at all.
Guidance masks need to be animated masks within After Effects. They are specified for each motion layer individually. You specify a first and a last mask, and those and the masks in between (according to the order they are listed in the layer) will then be used guide the tracking for this layer.
Now let yourself be guided through the wonderful art of guidance masks with these pretty bullet points:
- Guidance masks need to be animated within the After Effects toolset. I know that a lot of AMV Editors actually usually create a new mask for every frame when they want to mask something. However this way won’t work for Twixtor, as Twixtor needs to know the relation of the individual mask points over adjacent frames to get information about the motion of the pixels within the shot. (I myself believe that once you have the techniques down, actually animating a mask is better. Fight me.)
- All mask points should always stay at a fixed point on the tracked object. This will hugely determine the quality of the interpolation.
- Use the mask transparency to “turn on” and “turn off” guidance masks. In the examplary animations you see below you may see a mask stopping but still being displayed despite losing track of the object. Here the mask transparency of the mask is animated to 0%, which essentially turns them off from being used as tracking guides.
- They do not have to be very accurate. Very rough masks can sometimes make a huge impact to make Twixtor understand the general motion of the object. Highly recommended if the shot is dominated by motion blur (we talk about that later).
- They can also be really helpful if some things simply just move to fast. Make a quick mask and it could be fixed!
- If you already separated the scene into motion layers, you can try to use the same masks you used for the motion mattes as guidance masks! However, they must fulfill the two topmost requirements above.

To stop the hair and the hand guidance masks to warp the cushion in front of them, the cushion is put on a seperate motion layer for the relevant frames. The guidance masks (except the one for the cushion) are all applied on the background layer.
The same technique of using a motion layer to block off the influence of some guidance masks is used in the example below:
The same technique as in the last example is used here to block off the influence of the wave guidance masks on the non-water-surfaces by using a seperate motion layer. All guidance masks are applied on the background layer.

For this scene it is very difficult to remove all artifacts. But, as the scene is supposed to be played back pretty fast, only the essential motion needs to be captured within motion interpolation. Here, rough motion guidance masks can make a big difference. Especially, if heavy motion blur will be applied, the general motion in focus is the most important thing to the preparation of motion interpolation, as the motion blur will completely rely on the interpolation (See section 6.2).

Scenes where motion blur is applied on top of complicated Twixtor Pro comps take really long to render. Every final frame needs to render the Twixtor instance for at around 8 times (the number of motion blur samples you use).

Even single-point-masks can be useful as seen here for these flying sakura blossom things (it took a long time to track all these though).

Here you can see that as the wave splashes scale up, the details also scale up. Note however that every splash detail has its original detail even in the initial splash frame. It is essential that individual points of the masks need to generally line up with its inital position on the object (in other words, every point of the mask needs to track its initial position on the object).
5 Common misconceptions
5.1 Changing the twixtor output speed is not necessary if you plan to time-remap the footage anyway.
I have seen many people explain their way of using Twixtor by setting the Twixtor output speed to a very low speed (like 10%). The reason for that is that people think that is the only way to generate a set amount of interpolated frames. They assume if the Twixtor speed output speed was 100%, a slowdown of c-nested would simply result in a choppy playback.
But Twixtor does not work like that. It works in a very dynamic fashion. To explain this, you must understand the concept of fractions of frames described in section 3.
Because Twixtor supports fractions of frames, every imaginable in-between frame is already available just by time-remapping c-nested accordingly. We can also slow down c-nested as much as we want, it will still be smooth. The reason is simply that AE and Twixtor know exactly what fractions of frames are needed so that your edit in the main-comp is smooth. It might seem that it works like magic, but if you work with it you should start to understand the logic that AE and Twixtor are operating in (or just simply understand what I explain in section 3).
Slow motion is only applied in the main editing comp!
5.2 You do not need to change any comp lengths
See the section above. You don’t need to change the twixtor output speed, so changing the comp length of c-nested is absolutely unnecessary as well.
Slow motion is only applied in the main editing comp!
5.3 There is no single perfect set of Twixtor settings
I don’t think I have to mention this after what I wrote above, but people sometimes think that this is the case. The Twixtor settings all are made in order to adjust for all kinds of scenes. And anime can have all kinds of scenes. The settings will always be different for difficult scenes.
However there is one setting that has a rule attached to it that will always need to be fulfilled to make the interpolation work properly: You have to set the correct input framerate according to the scene’s animation framerate (Step2). This is essential.
6 What can we do with Twixtor enabled comps?
6.1 Slow motion and time-remapping without micro-stuttering
Having motion interpolation properly set up, you are free to slow down your footage to extremely low speeds. Speed gradients are the smoothest they can be.
Another small improvement interpolation brings is the perfect separation of frames. To illustrate this, let’s look at an example:
Assume we have some non-interpolated footage, which we speed up to, let’s say, 120% speed. Traditionally, this would mean that somehow AE now needs to skip 1 in 5 frames. This will result uneven playback speed which is easily noticeable.
With motion interpolation, this is immediately fixed. That is very easy to see by looking at another frame-table for footage sped up to 120%:
| Frame number in c-main | 1 | 2 | 3 | 4 | 5 | 6 | 7 | 8 | 9 | 10 |
| footage output frame without Interpolation | 1 | 2 | 3 | 4 | 6 | 7 | 8 | 9 | 10 | 12 |
| Resulting perceived playback speed without Interpolation | 1 | 1 | 1 | 1 | 2 | 1 | 1 | 1 | 1 | 2 |
| c-nested output frame with interpolation | 1.2 | 2.4 | 3.6 | 4.8 | 6.0 | 7.2 | 8.4 | 9.6 | 10.8 | 12.0 |
| Resulting perceived playback speed with Interpolation | 1.2 | 1.2 | 1.2 | 1.2 | 1.2 | 1.2 | 1.2 | 1.2 | 1.2 | 1.2 |
Notice that the perceived playback speed is only constant if interpolation is enabled. Here are some graphs to illustrate this behaviour.

Output frame number, using no interpolation
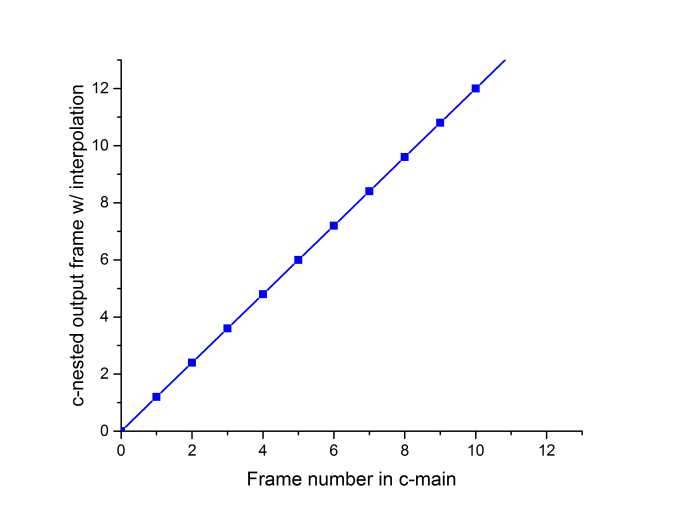
Output frame, with interpolation
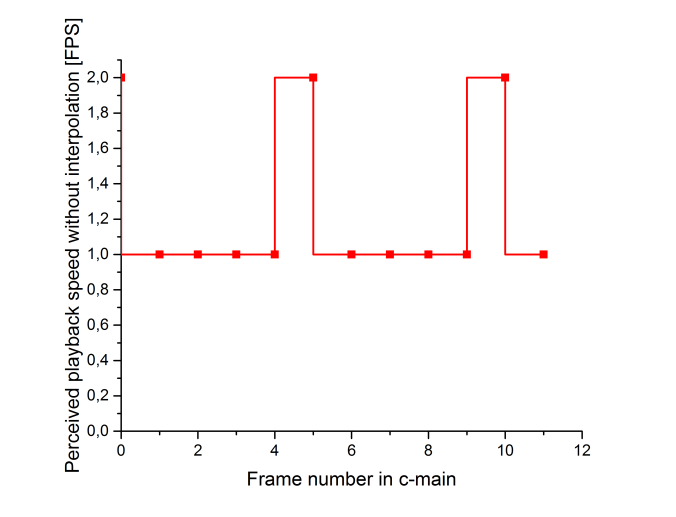
Resulting perceived playback speed, using no interpolation
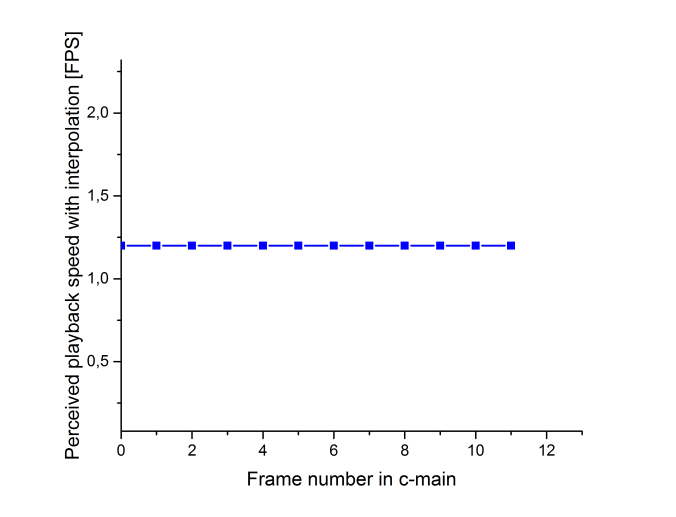
Resulting perceived playback speed, with interpolation
6.2 “Free” motion blur using 1st party effect CC Force Motion Blur
I’ve seen some people, even tutorials, where Twixtor is explained along with the imlementation of the 3rd party plugin “Reelsmart Motion Blur”. This, however, I do not recommend. You are wasting precious interpolation work if you do not use the interpolation already available after using Twixtor when applying another plugin that also has to do it’s own motion interpolation to properly calculate some motion blur.
CC Force Motion Blur is an effect that comes with AE and uses fractions of frames to composite a motion blur effect using several different samples (in-between frames). It is originally intended to work with hand-animated stuff, as for these things AE can automatically generate fractions of frames. It obviously works with Twixtor like a charm, as in-betweens can be freely generated. The huge advantage compared to the solution of using another plugin that does it’s own interpolation (next to wasting render performance) is that the work you put into Twixtor to make the interpolation work well directly impacts the quality of the motion blur as well. Often I literally applied motion guidance masks to Twixtor for only the reason that this certain object gets a way better motion representation due to the motion blur.

The red values indicate that I linked these values to a central instance of collected values via expressions. This enables me to quickly change these values for all clips in the whole project simultaneously.
To implement this, apply CC Force motion blur on the c-nestedlayers within c-main. Make sure to always link the “samples” property of CC Force Motion Blur to a central instance of the effect so you can always keep the “samples” at 1 until you do the final render, as the number of samples that the effects needs equals to the number of times Twixtor needs to render an interpolated frame in c-nested per frame in c-main! If the sample count is 8, AE needs to render Twixtor 8 times per frame!
Also make sure that all other effects you apply to a clip only ever should be placedbelow the CC Force motion blur effect! This is because otherwise all the other effects would have to be rendered 8 times per frame as well, because Force Motion blur needs them for the motion blur sample frames.
Using the effect can be a good way to hide Twixtor artifacts. If you want to hide even more, try turning up the shutter angle property.


6.3 Arbitrary frame-rate-output
If all your scenes are Twixtor enabled, you can output the video at arbitrarily high framerates (simply set the framerate in the comp settings of c-main).
Also, changing the framerate of c-main is completely dynamic. You can edit your video in 30 fps and then change the framerate to 60 fps for the final encode and still all the proper frames will be rendered in the correct framerate. However I do not recommend this, as you would do some different editing decisions if you work in 60 fps rather than 30 fps. But still the option is there, and the very possibility to output smooth high-framerate-videos, first of all.
7 Troubleshooting
7.1 Some frames are not interpolated
Most likely your “Input: framerate” is not entirely correct. Check if you counted correctly (Step2), and particularly, if you missed a change in animation framerate.
7.2 Red screen
Full red screen output means that Twixtor encountered an error. I’ve only yet come across it when the format of a motion matte did not line up with the original footage. I know someone who had this problem due to weird pixel aspect ratios. Try to limit yourself to pixel aspect ratios of 1:1.
7.3 Hardcore artifacts
If it’s too hard to fix, use another scene that doesn’t create this much of a problem.
8 The End
Woah look how long this thing got, omg. Well kudos if you read all these ramblings.
[mehr gelaber über was wenn noch mehr questions kommen? mich fragen auf discord oder so, auch bein vorschläge für den guide]
[danke an all die brüder und schwestern die gebetatestet haben]
btw sorry for the bad englisch X D X D